Main Page > GTA2 > Modding Tutorial > Putting a level ingame
When you've created a level with some buildings and roads, you probably want to take a look ingame to see what your map looks like while playing it. To do this, you'll need to install your level.
Save compressed
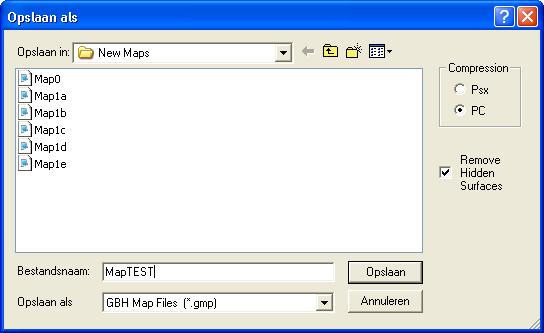
First, make sure your level is ready to be played. At the very least, you need a solid surface to walk on and a restart zone. If your level have these things, you have to save your map using the "Save Compressed" function of the editor. To do this, go to File > Save Compressed... or use the button with the floppy disk with two small arrows. This window will pop up:
It is recommended to save your own maps in their own folder, like "New Maps" or something. In this example, the new map is called "MapTEST".
Putting the map ingame
A singleplayer level needs three files:
- a *.gmp file (the map)
- a *.sty file (the style file)
- a *.scr file (the script)
You have already created the *.gmp file and the *.sty file is one of the files which is already present. This means you only need to create a *.scr file before you can play your map. See Main script for more information on creating a script.
There are several ways to put your levels ingame.
Adding your map using the test1.seq file
The most practical way of installing your level is by altering the test1.seq file. First, find the test1.seq file and make a back-up of it. Then open the file with notepad. Decide which original level you want to replace with your own level. In this example, we replace the Downtown District. Each level has its own entry in the test1 file. Downtown District is the top entry and looks like this:
MainOrBonus = MAIN
GMPFile = wil.gmp
STYFile = wil.sty
SCRFile = wil.scr
Description = City 1 Map
- "MainOrBonus" sets the level as a main level or a bonus level.
- "GMPFile", "STYFile" and "SCRFile" are the three files the level needs to run.
- "Description" is an internal description of the level, this isn't used ingame.
To replace the Downtown District with our own map, we need to change the entry of the Downtown District in the test1.seq file so it will use the files of our map. The entry of the example level will look like this:
MainOrBonus = MAIN
GMPFile = MapTEST.gmp
STYFile = wil.sty
SCRFile = MapTEST.scr
Description = TEST map
Save the file and place the *.gmp and *.scr file in the data folder.
Replacing the files of an original level
Another way of installing your level is by replacing the *.gmp and *.scr file of one of the original levels with the files of your own level. This way of installing a level is not recommended, because it has a risk of losing the original files when you don't make a proper back-up.
You can only replace a level which uses the same *.sty file as your level. In this example we've used wil.sty, so we can only replace the District which uses wil.sty, which is the Downtown District. Make a back-up of the files wil.gmp and wil.scr in the data folder. Rename the files of your own level wil.gmp and wil.scr and place them in the data folder. Press OK when a window asks you if you want to replace the original files.
Using a *.mmp file
The lastoption is to install the singleplayer level as a multiplayer level with one player. This means you don't have to replace or alter any files, but you can only start the level with the GTA2 Manager. See Creating multiplayer levels for more information.
| Mapping | Map Editor · Buildings · Roads · Water & animations · Slopes · Flat tiles · Collision info · Level edge · Zones · Putting a level ingame | |
|---|---|---|
| Scripting | Declarering: | Main script · Script Compiler · Code lists · Commands · Vehicles · Objects · Sounds · Characters |
| Programming: | IF · WHILE · COUNTERs · Subroutines · THREAD TRIGGERs · Kill Frenzies | |
| Both | Manual · Lighting · Car shops · Cranes & crushers · Gangs · Subway · Multiplayer levels | |
| File types | .gci · .gmp · .gxt · .mis · .mmp · .scr · .seq · .tmp · .sty | |
| Other | Texting · Physics · Creating vehicles · Terminology · Installing levels | |
Read in another language
This page is available in 1 language
